Thursday, December 21, 2006

Biscotti for all and to all a good night

My husband and I recently purchased our first home. Yay for us! Let's hear it for responsible homeowners! And being poor! Yay! So to save money we're doing a lot of the diy thing this Christmas, making ornaments, stuffed animals for the kids, and food. Lots and lots of food. Which is nice for me because I very much enjoy spending time in my new kitchen, among the black granite counter tops and clean new oven. And now that I've decided that I CAN actually bake, I'm eager to flex my newly found talent and use the untapped reserves of flour and baking powder in my cabinets. Among these food items I am preparing for our friends and family are biscotti. They are so incredibly delicious, so much so that I find myself "accidentally" breaking them so that I will have to eat them (darn!) because who wants to open a pretty gift bag and find broken biscotti? Not my friends and family. They are picky and demanding and I wouldn't want to upset them with broken biscotti. So to save my loved ones from the stresses of damaged cookies, I remove the broken pieces and eat them. And then I make another double batch. Inevitably some get broken from the new batch as well. You know how it is.

Anyway, biscotti is delicious and though time consuming (two rounds in the oven, plus cooling/drying time plus chocolate dipping time plus another drying time) it really is pretty easy. Especially when you have a three page laundry list of things to get done before the holidays that you can occupy yourself with in between pulling biscotti out of the oven and dipping it in chocolate.

Chocolate Almond Biscotti

You will need: (to preheat your oven to 375 degrees F)
1/2 cup softened butter (1 stick, unsalted)
2/3 cup granulated sugar
1/4 cup unsweetened cocoa powder (don't be cheap, use the good stuff)
2 teaspoons baking powder
2 eggs
1 3/4 cups all-purpose flour
1 teaspoon almond extract
1 cup semisweet chocolate chips (see note above re: cocoa powder)
another 1 cup good semisweet chocolate chips
1 cup sliced almonds

Take your softened butter and put it in a bowl with your granulated sugar. You can use the wax paper that the stick was wrapped in to grease your cookie sheet! (Double duty, way to go wax paper that wraps my butter sticks!) Take your electric mixer and cream the sugarbutter until it is creamed. Add your cocoa powder and your baking powder and mix until combined well. Beat in the eggs and the almond extract and enjoy inhaling the almondy chocolate scent emerging from your dough as you mix. Beat in the flour a little at a time, until your mixer gets pooped and won't mix the thick dough anymore. Fold in the rest of the flour by hand. (I use a rubber spatula, it is flexible and easy to use.) Fold in your 1 cup of good quality semisweet chocolate chips. Dump out your dough onto a lightly floured countertop, rip it in half, and form each lump into about an 8" roll. Put the rolls on your previously butterwaxpaper greased cookie sheet a few inches apart, and flatten them out to about 3/4" thick. Look at the unappetizing brown flattened loaves and think about how delicious they will be when you're finished. Pop them into the oven for about 25 minutes, or until a toothpick comes out clean. Remove from your oven and let sit for at least 30 minutes to cool, and turn the oven down to about 300 degrees. Carefully remove your loaves to a cooling rack if you so desire, but be careful! Once you bend the loaf you create a weak spot that will crack your biscotti later on. And then you will have to eat it all and make another batch for your loved ones.

In the meantime, take your almonds and put them on a cookie sheet and into the oven until lightly toasted. I never time this, but I estimate less than 10 minutes. DON'T LET THEM BURN or your friends and family will never speak to you again. Crush the delicious toasted almonds up slightly.

After your loaves are thoroughly cooled, take them to a cutting board and cut them diagonally with a serrated knife (to prevent breakage.) Place your biscotti back on the baking sheet and bake for about 5 to 6 minutes on each side, until dry and biscotti-crispy-like. Remove from the oven and let cool. Again.

In the meantime take your other cup of expensive chocolate chips and put them in a metal bowl atop a pot with lightly simmering water. Stir them until melted and then remove from the pot and let the chocolate sit for a few minutes.

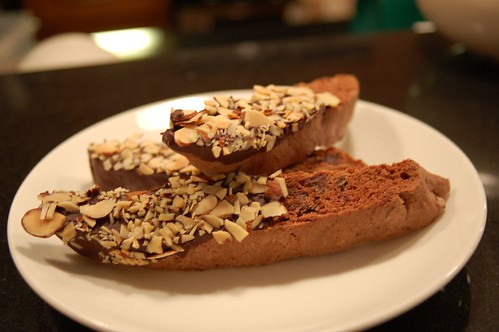
Take your cooled biscotti, dip them in the chocolate and then press them into the almonds. Let cool....again. I like to put them back on the baking sheet and into the fridge for 5 minutes or so. Works like a charm.

Throw all of your bowls and cookie sheets and plastic spatulas into the sink for your husband (or wife, roommate, cat, etc.) to clean up, wipe the flour off your brow, eat all of the broken biscotti pieces, wrap up the whole biscottis in cute little bags with bows (I like to put 6-8 in a bag) for your friends and family, and marvel at all of the money you saved making delicious meaningful homemade gifts instead of fighting the throngs of crazy shoppers on Michigan Avenue.

Thursday, November 16, 2006

Pomegranate Ginger Love

I had a party last week, and I did a typical fancy pants party move and came up with a signature cocktail, the Pomegranate Ginger Martini. It was simple, delicious and as far as I know everybody loved them. I purchased a few fresh pomegranates, with hopes to use the arils for a drink garnish but decided against it during my test run. I couldn't have people dropping the little juicy red seeds on the floor, grinding them into my hardwood, or worse, getting the little guys stuck in their teeth creating an embarrassing situation while conversing with my guests. Or choking. Having guest, even just one guest, choking on my signature party cocktail would have just ruined everything. So I left them out.

And having opened two pomegranates in preparation for the drinks I did not use them in, I had quite a few arils to find a use for asap.

I used some in cream of wheat (yum) and oatmeal (also yum) and in yogurt (double yum with some honey). But I still had about a cup and a half of the little guys left. So I swallowed my fear of baking, pulled out the flour and my silicone muffin pan (best. invention. ever) and went to work. The result? A deliciously tart yet sweet and spicy muffin whose recipe will be one of my staples for as long as fresh pomegranates are available at my local grocer.

First the most important recipe, the cocktail.

Pomegranate Ginger Martinis
  • 1 part Ginger Vodka (you can make your own....or you can buy the new polish vodka on the market, Alchemy. They also have a chocolate vodka that I'd like to learn to utilize. It is sold as Sam's Wine and Spirits.)
  • 2 parts Pomegranate juice. I used about half pure Pom and half of a pomegranate/grapefruit/apple juice that I purchased from my local polish sausage shop. About 6 hours before the party I peeled and sliced a large chunk of ginger and let is soak in the juice mixture to give it an extra kick.

Mix together with ice and garnish with a lemon wedge. Enjoy and don't spill on the white carpet.

Ok, now to the muffins.

Pomegranate Ginger Muffins

  • 1 cup pomegranate arils
  • 2 cups flour
  • 3/4 cup sugar
  • 1 tbsp baking powder
  • 1/4 tsp salt
  • 1/2 cup finely chopped candied ginger
  • 1 cup milk
  • 1 egg, beaten
  • 1/3 cup butter, melted and cooled slightly
  • sugar for sprinkling on the top

Preheat your oven to 400 degrees. Place 12 paper muffin cups in your favorite muffin pan. (mine is silicone.) In a large bowl, mix together the dry ingredients, then add the ginger and pomegranate arils. Make a well in the center for your wet ingredients, which you will mix together in a smaller bowl first. Add the wet to the dry and mix well until it is thick and unlumpy. Spoon the batter, as it is not pourable, into our muffin cups, sprinkle with sugar (and extra chopped ginger if you so desire) and throw in the oven for about 25 minutes, or until a toothpick comes out clean and the tops are browned slightly. Let them cool a bit (if you can stand it) so that they come out of the paper cups easier. Enjoy. They're really good if you split them open and let a pat of butter melt inside.

I recommend enjoying these muffins as breakfast, snacks, dessert, and even with the P/G martini. You'll be loading up on wonderful antioxidants, reducing aging and even your risk of cancer, and giving your gastrointestinal system a healthy dose of gingertherapy.

I think I need to go buy more ginger vodka. And stop telling everyone that I can't bake.

Tuesday, October 31, 2006

Cabbage!

For the last two years, my husband and I have belonged to Angelic Organics, a community supported agriculture (CSA) program in Northern Illinois. We purchased a share which we split with another couple, and we get more delicious local organic veggies every week than we would ever have if we were on our own to shop for them. We get things we know very well how to eat (potatoes, hierloom tomatoes, broccoli, garlic), things we've had to learn how to eat (lemon balm, green tomatoes, beets), and things we have yet to learn to eat (sunchokes, multiple heads of cabbage). Now I know how to make a pretty good cole slaw, but that was about the extent of my cabbage "cooking" ability. I have been afraid to cook it with any heat, with my mental images of limp grey watery blah-ness, which I refused to even consider serving. I tried a schezwan style stir fry, but it wasn't very good. I wasted more of last year's cabbage than I care to admit, because two people can only eat so much slaw, and this year I decided to find a delicious recipe and eat all of the cabbage bestowed upon us by our wonderful CSA. The secret, my friends, is bacon.

Creamy Braised Cabbage
(I doubled everything because I had two heads of cabbage, one red and one green, and it turned out fine.)

2 tablespoons butter
1/2 cup chopped onions
3-4 strips of bacon, coarsely chopped
1 tablespoon all-purpose flour
1-14.5 oz can chopped tomatoes
1/2 cup chicken stock
1 head cabbage -- cored, coarsely chopped
2 teaspoons parsley sprigs -- chopped (I used dried)
1/4 cup sour cream
1 tablespoon cornstarch
salt and black pepper

Melt your butter in a dutch oven or other oven-and-stove-top-safe dish and throw in your bacon. Cook until it is just starting to crisp up, then add your onion and saute until tender. Stir in the flour and cook for about a minute. Add the canned tomatoes (with the juice) and chicken stock and bring to boil, stirring constantly. Add cabbage, parsley, and salt and pepper to taste. Cook for five minutes, then cover and place in preheated 375-degree oven for 45 minutes, stirring occasionally so the top layer of cabbage doesn't dry out. Pull it out of the oven. You want your cabbage sort of wilty, but still a tiny bit crunchy, kind of al dente. Blend your cornstarch into the sour cream and stir in 1/2 cup of liquid from cabbage. Pour over the cabbage and put your pot into the oven again, uncovered, for about 15 minutes longer. Eat it and enjoy it.

Next time I might add a little parmesan cheese to the top, and maybe some crispy bacon to sprinkle on top right before serving. Mmm. Wouldn't that be good? More bacon! In fact, I might do that with some of the leftovers tonight. Because I can't wait to eat this stuff, it is so delicious.

I don't have any photos because I am lazy and I don't like to stall eating. Maybe next time.

Tuesday, September 26, 2006

So I'm getting ready to move and I've packed all of my kitchen doo dads and hoo has so I can't cook. And I've been really busy (for what appears to be the last 6 weeks or so) so I have neglected the culinary documentation that I promised to supply with this blog. I have cooked some delicious things in the last 6 weeks or so: roasted seasonal veggies, potato and leek soup (twice), stuffed fall squash, garden veggie spaghetti sauce, and even a pumpkin pie. But alas, I did not photograph, take notes, or remember to type it up here.

So instead I bring you a short and sweet restaurant review.

Treat (1616 N Kedzie Ave)

Treat hasn't been around long, and apparently is owned by the same people who started my absolute favorite restaurant in the world, Lula Cafe. It is BYOB (which I always find refreshing, as the restaurant can spend more money and energy creating a wonderful food menu rather than sub-par wine and beer list) and the prices are very reasonable. It is one of the only (if not THE only) hip foodie restaurants in Humboldt Park, and a little hard to get to (which started to get to us at 9:00 at night when we couldn't get a cab back home.)

However, it was well worth the trip and the 20 minutes trying to find a cab after we were finished. The decor is simple and casual, which made us very comfortable, and it wasn't crowded at all on a Friday night. We started with the fennel gratin, which was smooth and creamy, perfectly cooked and delicious. I'm not normally a big fan of fennel, but I will order it again at Treat. It was a perfect size portion for two, and we practically licked the dish clean it was so incredible.

We then shared the roast duck (not on the menu, it was one of the specials) which was both a treat (hehe) and a disappointment. The flavors were divine, light and savory, smooth and satisfying, but the duck was unfortunately overcooked. It was tough and hard to cut with the butterknives we were given. We ended up leaving some of the duck but we ate all of the rice and delicious broth it was served on.

For dessert we shared the creme brulee, infused with passion fruit, and I almost fell off my chair it was so good. I was amazed by the tartness of the fruit achieved within the creamy smooth custard, and the size and shape (a low oval dish rather than a deep small round dish I've been served at some restaurants) produced the perfect amount of crunchy sweet caramelized sugar to delicious milky passion fruit custard. Creme brulee is one of my all time favorite foods, so I always order it if it is on the menu, and I was incredibly happy that I did it at Treat. In fact, I've been thinking about it ever since....

We left satisfied and full, forgiving the overcooking of the foul in exchange for the delicious flavors and the perfect gratin and brulee we had the treat (hehe) of tasting. I will definitely go back, but maybe try one of the sandwiches or salads, and find a different mode of transportation next time.

Thursday, August 10, 2006

Polenta!

I don't know what has taken me so long, but I only recently really discovered the wonderful Italian staple that is polenta. And oh my god is it delicious. It has replaced risotto as my wonderful perfect too-much-stirring side dish. About a year and a half ago I discovered risotto and I made it at least 3 times a week for a few months. Polenta is doing that for me now. Except that the following recipe makes so much polenta that I can eat it 3 ways in one week, saving my stirring arm and keeping my taste buds happy.

Polenta is made from cornmeal, a cousin to grits, which apparently rivals pasta for popularity as an Italian staple side dish. It is simple to make, requiring only a few ingredients for a basic recipe that can be accented with any number of additions for a different dish each time. Like risotto, making polenta takes a little bit of elbow grease by stirring for 20-30 minutes while it cooks, but it is worth every stir. Especially when you can eat it three different ways in three days.

Basic Polenta
6 cups water
1-2 tbsp salt
2 cups polenta
1 cup(-ish) freshly shredded parmesan cheese
salt and pepper to taste

1. boil water.
2. add polenta in a steady stream, stirring to avoid lumps.
3. turn heat to low and stir every minute or so for 20-30 minutes, until polenta is thick enough to stand the spoon up on its own and pulls away from the sides of the pan.
4. turn off heat, stir in parmesan and salt and pepper to taste.
4a. you can either spoon it directly into a bowl and eat it (using the wooden spoon you stirred it with);
4b. spoon it into a bowl, let cool slightly, invert the bowl, and cut into slices much like a pie;
4c. spread it on a cookie sheet, let cool 20-30 minutes, cut into squares or use a cookie cutter to cut a cute shape (stars! flowers!), baste with olive oil and broil for a few minutes on each side until you have golden brown and delicious little crispy polenta cakes;
4d. top with marinara and mozzarella;
4e. reheat it the next day by wrapping a few wedges topped with butter in foil, placing the packet on the grill with whatever else you're grilling that night;
4f. lots of other things. Use your imagination.

I'm going to make it again next week and add chopped jalapeno and onion for a spicy kick, and again the week after that with some thyme and roasted garlic for a more savory flavor. Then I might make a sweet version with some cinnamon and sugar. The possibilities are endless, really.

So there you have it. Polenta, my new favorite side dish. Perfect for any occasion and a great addition to any meal. Especially citrus marinated chicken and broccoli.

Friday, August 04, 2006

I've been meaning to really get this thing started, but I have not done so yet. And I am prepared with reasons why:

1. It has been too hot to cook anything. And as soon as I DO cook something, I am too hot and sweaty to make it look pretty and photograph it and take notes to base a post on later. I just eat, immediately, naked in front of a fan. Nearly naked, at least.

2. Our refrigerator broke last week and has only just recently been repaired. So it was a little bit difficult to prepare delicious recipes with no fridge in my kitchen.

3. My camera was not made to take food porn photos. I did make a delicious homemade eggplant pizza the other night, but the photos looked like dog food run over by a bus so I scrapped any idea I might have had about writing about it. My loving husband has a wonderful nearly professional camera, so I believe I will attempt to bribe him into carefully watching and documenting every step of my meal making process from now on.

Soon, friends. I will do this, I swear!

Wednesday, July 19, 2006

....aaaaand GO!

I love food. I love everything about it, especially how the same ingredients can come together in different ways to create a multitude of flavors, textures and colors. I love to look at food, shop for food, smell food, touch food, cook food and eat food. I love to learn about food, and about cooking. And although I come across as a food snob, I am well aware that have quite a bit to learn. I'm an untrained home chef, always experimenting and challenging myself to create something delicious. And I want to share what I know and hopefully get a few tips and improvements on my recipes back in return.

I break rules, I misuse ingredients and gadgets, but I have only once in my cooking life had to throw something away and order pizza. But maybe that just means that I'm not challenging myself enough....